
Lorem ipsum dolor sit amet, consectetur adipiscing elit. Suspendisse varius enim in eros elementum tristique. Duis cursus, mi quis viverra ornare, eros dolor interdum nulla, ut commodo diam libero vitae erat. Aenean faucibus nibh et justo cursus id rutrum lorem imperdiet. Nunc ut sem vitae risus tristique posuere.
Jan 2022 - May. 2022 (Launched)
1 Product Manager
1 Product Designer (me)
3 Front-end Engineer
1 Back-end Engineer
1. Created the product from 0 to 1
2. significantly increased new users within 2 months
1. I was the only designer in this project, I owned the design of every detail of this product.
2. Collaborated with the product, development and marketing team

Vland Builder is a tool that enables users to create their own virtual space for online events. It allows users to customize every element of the virtual space, including the floor, wall, furniture, photos, text, interactive objects, and special effects. Once the map is created, users can publish it to Vland to hold their own online events.

Vland is a virtual live platform that provides virtual space as a service to pan-industry scenarios, in which users can have personal identities, socialize in space, and contact through real-time video, just like in the real world.
But now the space service is created by professional designers and the marketing team in our company because the space design process is too complicated for users without professional training.
To increase clients of our product, letting users design the space and modify the service by themselves is an urgent need.
There are 2 causes for this problem:
1. Users aren’t familiar with design tools:
Most Users don’t have professional design experience and aren’t familiar with designing tools.
2. Rules for the virtual space are complicated due to technical restrictions:
To make the virtual space more like the real world, the developing team set up complex rules of tile maps, which contain 9 different layers. These technical restrictions make map building more complicated for users.
Easy To Use - The product's visual design and functionality largely meet user expectations, users can complete tasks with no guidance or minimal prompting.
Wow - On the basis of usability, the product has a positive performance that exceeds expectations; X% increase in user satisfaction and X increase in active users.
To design and develop quickly and efficiently, we came up with a 2-week sprint for the design and development team, in which design is one week ahead of development. In the first week, we present the design concept and features for the next week to the development team. Meanwhile, they would run a testing demo for last week’s feature and do technical research on next week’s feature. In our second week, we would adjust the design according to feedback from the development team and get the design documentation ready for their next sprint.
In order to deeply understand users’ needs, I conducted a series of interviews with existing users, the business development team, and collaborative designers. According to our product goals and current marketing practice, we can divide target users into three groups: Collaborative Designer, B2B customer, and B2C customer.

To deeply know the workflow when users design a Vland map, I conducted a design test with two types of users, professional users, and non-professional ones.
Testing goal: To understand the user’s mental and behavioral models, so that the builder can meet the user's expectations as much as possible.
Testing process: Let users build a scene through normal space design tools, and observe their design process.
Results: Professional users have a plan before they build the scene while non-professional users focus more in details, they place items randomly.

1. Our users have a mix of skill sets, we must make the editor easy to use for non-professional users without frustrating advanced users.
2. Instead of having the plan to do the map design, non-professional users add assets randomly, we must introduce the concept of designing a Map in Vland and lead them to finish designing in a high-efficiency work flow.
Our team conducted a series of workshops with stakeholders from business, product management, and engineering in order to gather ideas and input for the MVP features of Vland Builder. Through these workshops, we were able to create a comprehensive list of basic features and identify key assumptions. This information served as the foundation for our strategy of implementing the MVP through a series of incremental releases. We are able to make decisions for each subsequent release by evaluating the feedback and performance of previous releases.
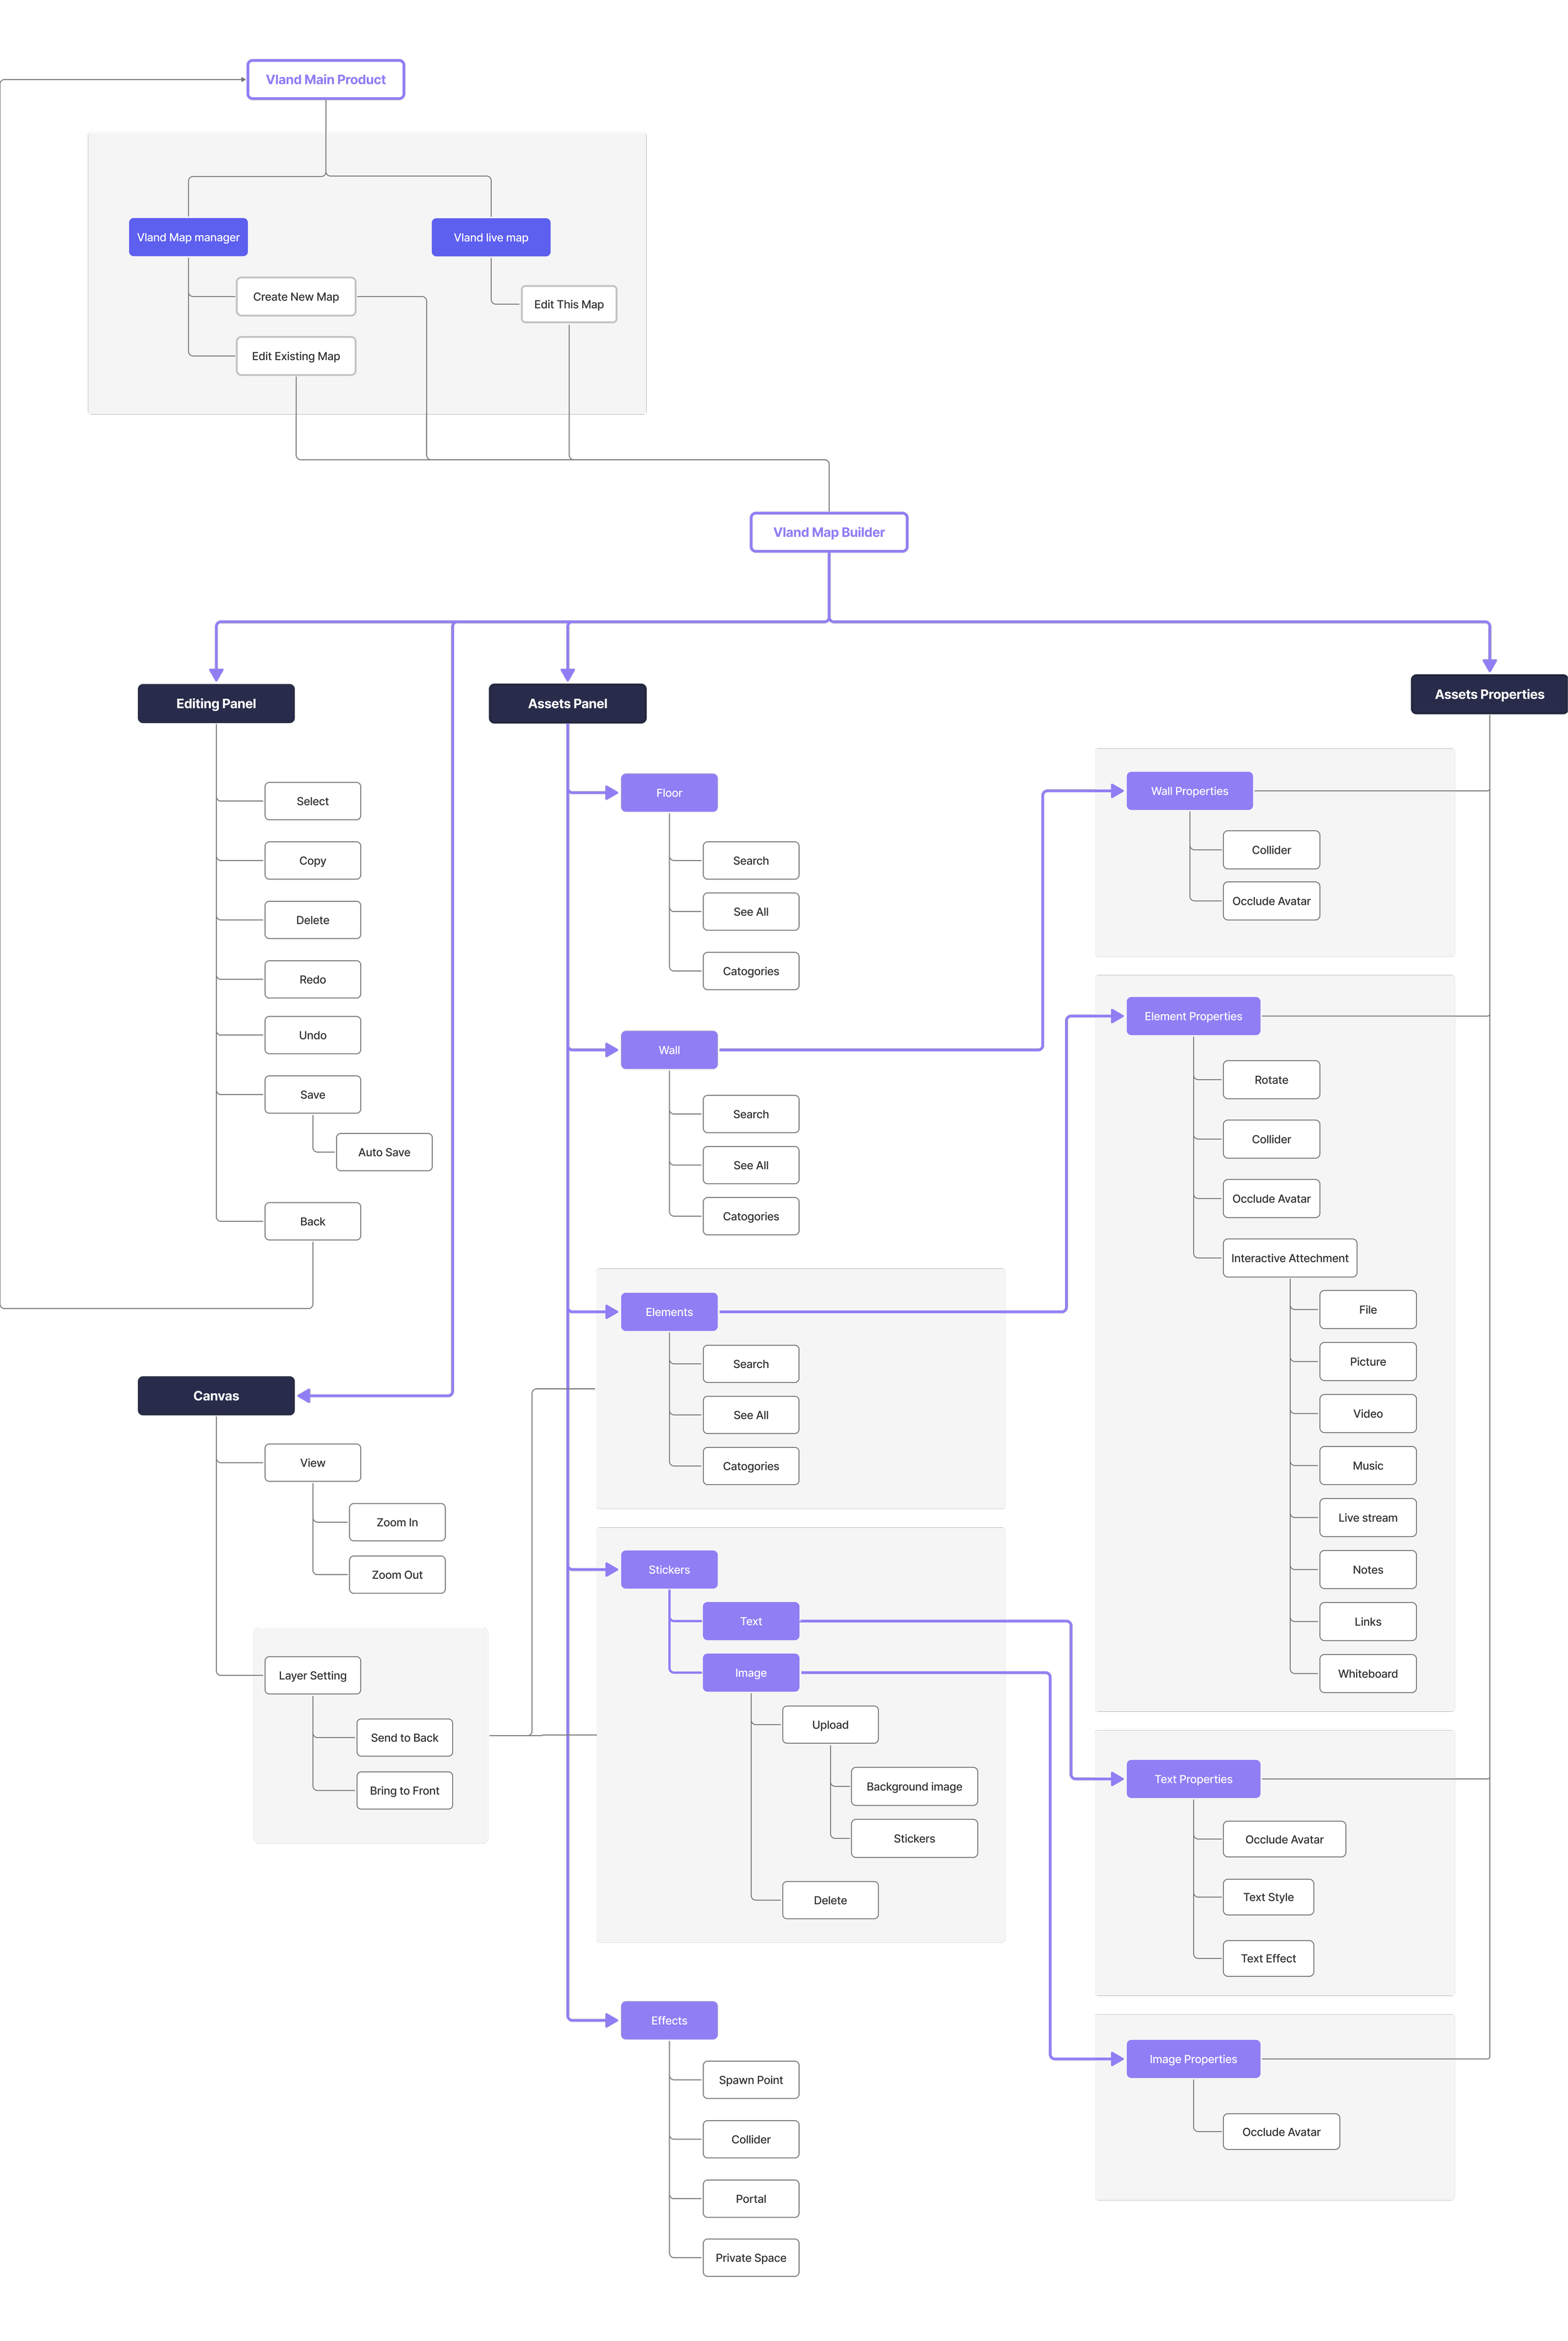
The main goal of designing the layout for Vland Builder is to create an intuitive workflow for users and make it easy for them to understand the process of designing a Vland Map. The layout should be similar to commonly used design tools such as Office suites and Canva. Through user research, they were discovered as the most popular tools among non-professional users. After considering product features and user habits, three layouts were designed. Ultimately, layout 1 was chosen because it has a simple operation and a lower learning cost for users.

Vland is a virtual space built on a tile map using the game engine. To enhance realism, we added the effect of occlusion. For instance, the attendee is hidden behind the tree, drinks are placed on a table that sits on the floor, and the wall partially obscures the attendee while partially blocking their path. The development team implemented 9 separate layers to achieve this effect, but it can be challenging for users to distinguish between these layers and place assets in the correct one.
The Occlusion Effect of Vland Map
User’s exceptions:
Simply set assets forward and backward.
Technique restrictions:
1. Each layer has it’s order on the technical side, it cannot be moved up/down easily.
2. We already have more than 1000 templates and user-self-made maps serving in the market, If we change the layer settings, we have to transfer previous assets to new layers. This transformation has a large potential to interrupt the previous service.
Separate assets and images in different layer groups, in which users can drag them up and down in that group.
Improvements:
1. Add a thumbnail to each of the assets to help the user differentiate layers.
2. Replace the drag feature with a menu, which has a higher succeed rate in Web Application.
Problems:
1. Users are still confused about the separated layers.
2. Users need 3 clicks to change assets order.
Problems:
1. It is hard for users to understand the separation between assets, they might wonder why they can’t drag the asset to another group.
2. It seems hard to differentiate assets when there are more than 3 assets in one tile.
3. The drag-and-drop feature doesn't work well in a Web Application. It’s a technical problem.


How might we explore technical solutions and consider ways to simplify layer settings to tackle the problem at its root?
After communicating every detail with the development team, we came up with 3 new layer settings. We tested each layer setting with 4 map cases:
1. Objects + Objects in one tile
2. Objects + Floor in one tile
3. Objects + Wall in one tile
4. Complicated scene with multiple assets
Finally, we choose the first one since it requires the least changes from the development team meanwhile can achieve a relatively good effect for users.
Layer Change Testing
New Layer Settings


In old layer settings, photos are able to store in every layer; the user can adjust asset orders by manually selecting a layer. While in the new layer settings, layers were separated into layers in front of the avatar and layers behind the avatar; each asset has a default layer arranged by the asset properties; the user can change asset order in the same layer; when they set it as “Appear in front of attendees”, the asset will be moved to the layer in front of avatars.
1. Making data classification clearer, making asset order adjusting easier.
2. Simplify interactions from 4 steps to 3 steps.


Before
After
The layout design is based on common non-professional design tools, making map editing easy to start.
Users can add assets from the left panel following the “Walls”, “Objects”, “Photos”, and “Effects” order; while when they select assets already in the canvas, the left panel will change to the selected asset category.
Provide users with multiple interactions by simply clicking.
Hide the complex layer settings on the technical side to create a simple outcome of the user interface.
Add various object interactions based on distance to make the map more functional and more like the real world.
Apart from the non-professional users, we offer advanced personal asset uploading and managing for professional designers.
y.fan@berkeley.edu
©2023 YUE FAN